Wednesday, November 20, 2013

Baked Pumpkin Donuts

I did promise you a great pumpkin recipe, right?

Here I have donuts. Just a couple of down to earth humble donuts. With pumpkin mixed in the batter.

I have to admit that as much as I avoid eating deep fried food, I would at least once a month go to Dunkin Donuts for a donut or two. Usually when I have PMS. I just need something less bad than my behavior to make me feel good about myself. PMS aside, donuts are easily everyone’s feel good food. Take Homer Simpson or just about every beer-bellied policeman in the States for example. Got a bad day? Have some donuts.

Of course I do not have an intention to clog my arteries and I don’t wanna give my daughter a bad example. So I was pretty lucky to come across some donut pans two years ago. Yes, you can bake donuts and that means less fried food to eat! I used to sell baked donuts, you know. But not anymore because I find it utterly liberating to be able to have more free time to do things I like such as going back to school myself and waking up late. Baking donuts daily was me derailing from my main path. I much prefer to take pie orders because it’s not an everyday treat.

These beautiful Baked Pumpkin Donuts are a cinch to make and it’s packed with fiber. The texture is cakey because it is using baking powder to fluff it up instead of yeast. These are something that you would wanna serve to your beloved family on weekends or any other drab day; sweet and fragrant and fulfilling. The taste improves with time. So don’t be surprised to wake up the next morning to find them taste even better than the day before.

Recipe adapted from King Arthur Flour
Makes 12 Donuts
Ingredients:
1 cup all purpose flour
3/4 cup whole wheat flour 
2 tbs wheat bran
1 1/2 tsp baking powder
1/2 cup vegetable oil
3 eggs
1 cup sugar
1 1/4 cup pumpkin purée (see Directions)*
3/4 tsp ground cinnamon  
1/4 tsp ground nutmeg and 
1/4 tsp ground ginger
1 tsp salt
Fine donut sugar, for dusting
Note: You can use just all purpose flour if you don't have whole wheat flour and wheat bran though the texture will be different but not less tasty.

*Directions:
*Prepare the pumpkin puree by steaming the peeled and seeded pumpkin. I strongly recommend you to buy a small pumpkin. The reason is the original recipe requires canned pumpkin. Yes, it is sold here in Indonesia but I don't eat canned foods and we surely have no problem in finding pumpkin anytime of the year.
*After you steamed your pumpkin, mash them, and cook them in low heat so the water contained evaporates. This is a crucial step because steamed pumpkin contains a lot of water and if you use it in this recipe, you will have a runny batter and your donuts will be rubbery.
*Keep stirring to avoid burnt pumpkin. You are looking for a very thick consistency and do prepare yourself for a divine smell while doing it.
*Cool the thick pumpkin puree and measure 1 1/4 cup. Freeze the rest. You would wanna have this in your freezer.

Now let's get on the mixing...
-Beat together the oil, eggs, sugar, pumpkin, spices, salt, and baking powder until smooth.
-Add the flour and wheat bran and stir just until smooth. 
-Lightly grease two standard donut pans and fill with the the batter.
-Bake the donuts for 15-18 minutes at 175C. Do insert a toothpick into the center of one of those donuts. If it comes out clean, they're done.


If that is not divine enough for you, I don't know what is...

-After about 5 minutes, gently loosen their edges  with a toothpick and transfer them to a rack to cool.
-While the donuts are still warm, roll them in fine donut sugar. Note that donut sugar is different with icing sugar. You can find it in baking supply store. it's less sweet and finer than icing sugar. Of course icing sugar is okay. But why be okay if you can be perfect. Beside, its price is just the same as icing sugar.


Gorgeous!

If you don't have the luxury of having donut pans, you can still make muffins with this batter. I can promise you they are going to be one of the best muffins you'll ever have. Just remember to add more baking time if you're making them in muffin tins or liners.

Now who wants some coffee with this?

Cheers,
Amy

Stumble Upon Toolbar Pin It

Sunday, November 17, 2013

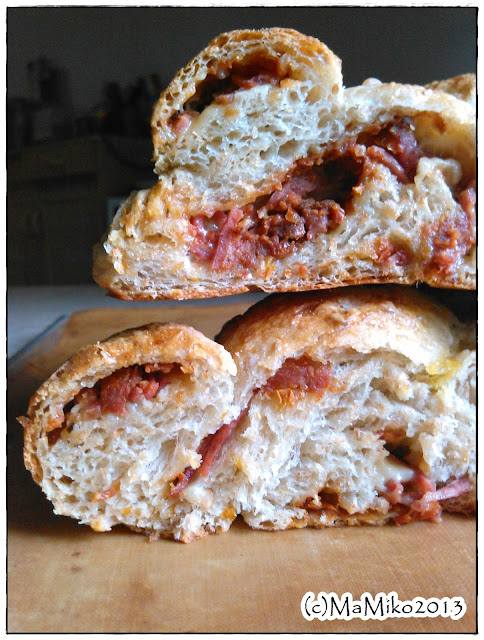
Sun-dried Tomato, Smoked Beef, and Cheese Bread

I woke up this morning with an unbearable desire for bread.

I am extremely grateful that Taiphoon Hayan did not pass Indonesia and being in the same region where it stroke, we still have downpours several times a day. But who am I to complain. I still have a dry bed to sleep on though it’s way passed its prime ten years ago and sturdy roof with leak spots bonus courtesy of a self proclaimed brilliant  architect my sister in-law recommended. Life is good.

Getting my chia seeds out of the fridge I saw a half full jar of sundried tomatoes and it just might be the perfect match for the bread I was about to make; rustic and bursting with flavors. Since I have absolutely no plan to go out and zero intention to cook lunch, the bread itself has to be dense and fulfilling enough to qualify as lunch. So, modifying the bread base of my Braided Pesto Bread I present you Sun-dried Tomato, Smoked Beef, and Cheese Bread. 


Bread Ingredients:
285 gr bread flour
15 gr wheat bran
3 tbs golden flax seeds
1/2 tsp salt
1 tbs sugar
2 tsp instant yeast
-/+ 1 cup water
70 gr sourdough starter, optional

For The Filling:
8 sun-dried tomatoes, mashed
4 slices smoked beef, thinly sliced
Cheddar cheese, preferably old, grated
Dried herbs such as thyme, oregano, or rosemary
---
Egg wash, optional
Note: If you don't have wheat bran, just use all flour

Directions:
-Combine all the bread ingredients. Knead well, oil the bowl, and leave it to proof until the size is doubled about an hour or so.
-Lightly oil your work space and roll your dough into a 12x18 inch rectangle then cut into three pieces on the long side.
-Spread the mashed sun-dried tomatoes evenly, scatter the smoke beef slices, grated cheese, and finish by sprinkling it with your herbs of choice.


-Roll each piece individually so you have three long rolls and braid them like you do the Challah then round them up together.
-Let the dough rise covered in cling film for 30 minutes then bake for 25-30 minutes in 215C oven.


I am not jumping with glee with the braiding this time because I put too much filling in one of the braids ;p that's nothing new. But nevertheless, the taste.. is impeccable!


The flax seeds in this bread give a nutty taste, lovely texture, and provide no argument about the health benefits they offer. The crust is so crispy and the crumbs are out of this world soft and delicious with a nice sourdough tang. This is also a kind of bread which taste improves overnight because the oil from the filling will be absorbed by the bread. So left overs are intentional.


SMELL THE LOVE!
You know you can always make a simple sandwich with the same filling combo of sun-dried tomatoes, cheese, and meat. But why take the simpleton way of eating if you can build layers and layers of flavors with the exact same ingredients?

Interesting things come when you're willing to take a journey further from your comfort zone. That being said, I'll brew some coffee because I'm off for some interesting adventures myself this afternoon with my books.

Have a dazzling rainy afternoon,
Amy

Stumble Upon Toolbar Pin It

Tuesday, November 5, 2013

Norwich Sourdough

This is THE wonderful sourdough recipe that I have always wanted to share but keep forgetting because it’s just oh so good you'll forget what you were about to do before. At home, we’re not that good at waiting till the bread cools before we eat them. So every time I bake these, once they’re out of the oven, we usually wait for 5 minutes just so that we can listen to the crackling sound the crust makes and deeply inhale the fantastic aroma, then indulge like we have not eaten a single gram of carbohydrate in a month.

Norwich Sourdough.


The name was given by Susan of Wild Yeast to honor the Vermont hometown of King Arthur Flour where Jeffrey Hamelman resides and teaches. She adapted this recipe from Hamelman's book, Bread: A Baker's Book of Techniques and Recipes; THE book I really want for Christmas. If you are a bread enthusiast like me and spend hours reading about bread on the internet, I’m pretty sure you would come across this wonderful sourdough bread because it’s widely popular. 

Yield: 1 kg (2 medium rather large loaves)
Ingredients
450 gr all purpose flour 
60 gr  rye flour 
300 gr water at about 74F
180 gr mature 100% hydration sourdough starter**
11 gr salt
Note: 
Feed/refresh your starter at least three hours before making the bread
**100% hydration means equal part of flour and water for feeding

Directions
-Mix the flours, water, and starter  until just combined.
-Let the dough rest (autolyse) for 30 minutes.
-Add the salt and continue kneading (or mixing if you have the luxury of owning a good mixer *cue to hubby*) until the dough reaches a medium level of gluten development. This should only take about 5 minutes.
-Transfer the dough to an oiled container (preferably a low, wide one so the dough can be folded without removing it from the container).
-Ferment at room temperature  for 2.5 hours, with folds at 50 and 100 minutes.
-Turn the dough out onto a lightly floured counter. Divide it into two. Preshape the dough pieces into balls.
-Sprinkle the balls lightly with flour, cover loosely with plastic, and let rest for 15 minutes.
-Shape into batards and place seam-side-up in a floured couche. If you dont have it, simply rest the batards on your silpat/good quality parchment paper lined tray seam-side-down. Though I have a couche, unless I'm proofing baguettes, I much prefer silpat/good quality parchment paper because it is simply more convenient.  I don't I need to transfer the proofed loaves to tray hence there is a lesser room for error.
-Cover with plastic wrap and proof at room temperature for 2–2.5 hours. 
-Preheat the oven, with baking stone if you have it, to 240C. You will also need steam during the initial phase of baking, so prepare for this now.
-Turn the proofed loaves onto a semolina-sprinkled peel or parchment if you're using a couche. Slash each one with two overlapping cuts that are almost parallel to the long axis of the batard.
-Once the loaves are in the oven, turn the heat down to 225C. Bake for 12 minutes with steam, and another 15 – 18 minutes without steam. Leave the oven door cracked open a bit for the last 5 minutes of this time. The crust should be a deep brown. Then turn off the oven and leave the loaves in for 5 minutes longer, with the door ajar.

Time Frame
Mix/autolyse: 35 minutes
First fermentation: 2.5 hours
Divide, bench rest, and shape: 20 minutes
Proof: 2.5 hours (or 1.5 hours, then retard in the fridge for 2 – 16 hours if you plan to bake it later )
Bake: 35 minutes


My friends always ask me about feeding a starter matter and the time needed between refreshing the starter and using it for the bread making. Well, not all starters are the same. Some are stronger than the others. Mine, it thrives in harsh environment, our house is filled with yell hard love harder ladies, it's alive and kicking. But one thing I do like, is keeping my starter at 50% hydration. That means feeding it with flour and water with 2:1 ratio. That allows me more time between each feeding time.

About the sourness of the sourdough bread itself, I concur that there is no bread made with sourdough would taste identically the same. Store A's bread would taste different even it's only slightly with store B's. Depending on how you maintain your starter and what you've been feeding it, certainly rye fed starter would produce more sour bread than white flour fed. I alternate Bonnie's feeding with rye and white flour because we love the rye taste in our bread and pizza but we don't want it to be overwhelmingly rye-ish.

I strongly recommend any sourdough lover to try this recipe. It has great crust and the crumb is surprisingly soft.


What do I do with so much bread in the house?  


Make French Onion Soup of course!

Love,
Amy

Stumble Upon Toolbar Pin It