I owe this post to a lot of my friends who, until this very
moment, keep saying how hard it is to make bread at home and how much money
they should spend on a Kitchen Aid mixer or just any mixer to knead the bread
dough. I hope by posting this particular recipe, those kneading challenged
people out there would have no reason to not make their bread at home, except
when the word ‘lazy’ is their excuse. For that, I shall rest my case.
When I say 5 minutes, I literally mean 5 minutes is the
amount of time needed to mix the ingredients and to shape a loaf.
"Really? Is there something you're not telling us, Amy?" I am pretty sure you'd ask me that.
When has something ever been so transparent without any hidden intention whatsoever. But worry not; I will not trick you to make something that sounds easy but hard in the process.
"Really? Is there something you're not telling us, Amy?" I am pretty sure you'd ask me that.
When has something ever been so transparent without any hidden intention whatsoever. But worry not; I will not trick you to make something that sounds easy but hard in the process.
Before I started on my bread making journey, I stumbled on a
very inspiring site www.artisanbreadinfive.com. The way they make their bread is so.. kneadlessly simple! You can watch the video HERE. After searching for
more information about their no knead technique, I purchased their book Artisan Bread in Five Minutes a Day. It was
my first bread baking book. I love how simple yet quite elaborated their
explanation is on the science behind this no knead bread. A chef and a scientist
as the authors, do I need more reasons to not gulp down their book?
They have developed a master recipe. You need only to use
the master recipe to make different kinds of bread in their book. But since
they use only white flour, hereby I present you MY master recipe, using less salt and 55:45 all purpose-whole wheat flour ratio. Notice that I use instant yeast not active dry yeast because instant yeast is sold even in the smallest shop here so it's more accessible for everyone.The amount of the instant yeast I use in my master recipe is already converted to the amount of active dry yeast required in the original recipe.
Does the price of good European store-bought bread choke you? Can you even find a good one at the shops in Jakarta? if your answer is a yes and no, respectively, then read on.
Makes four 1 pound loaves. You can half or double the recipe.
Ingredients:
 3 ½ cups all purpose flour
3 cups GoldKorn High Fiber Mix Flour/Balastra flour/whole
wheat flour
1 ½ tbs instant yeast
1 tbs+ 1 tsp salt
3 cups lukewarm water
Note: If you don’t have the specialty flour above, just use all
purpose flour.
Let’s make this outstandingly simple bread!

Put all of the dry ingredients in a big plastic container. Mix well then pour the water in.

When you mix, make sure there are no flour lumps. You want your dough to be somehow shaggy, not crumbly. If you think you need a bit of more water to make a consistency like the right picture above, do add a tablespoon at a time. You don't need to knead or put your hands in. Just a spoon and a quick stir that takes 2 minutes at the most.

Put the lid on. Do not use an airtight container because the dough needs to breathe. Leave it out at room temperature for 2 to 4 hours then put it in the fridge overnight. You can make bread from this dough on the following day. But I strongly advise you to wait for at least 4 days to get that sourdough taste. It will be even better at day 5, 6, 7 and so on. Once you open the lid, the dough will have a very, very pleasant sweet and fruity smell. It is a sign of the fermentation process and that, my friend, is the magic work of nice bacteria.

On baking day, prepare a plate with some flour and a very smooth wooden or plastic board, preferably with a handle, and sprinkle the board with some corn flour. The original baking tool for proofing this is actually a pizza peel. But I don't have it. So any wooden or plastic board should do the trick. You can't find cornflour? Just put some dried corn kernel in a blender. No fuss needed.

Sprinkle some flour on the surface of the dough. This is called gluten cloak. Imagine yourself feeling cold and your mom covered you with a warm blanket.The technical explanation would be that you want to add enough flour to the surface so it can be handled and the protein strands in the surface can be aligned, creating a resilient "cloak" around the mass of wet, barely kneaded dough. Grab the dough with your hand, just about the size of a large orange or grapefruit, then cut it with a kitchen scissor or a serrated knife.

Put the lump of dough on a plate filled with flour, roll it in the flour very quick and lightly. You don't want to incorporate too much flour here. Stretch the dough then shape it however you want it. I am making a boule, that is just a fancy French way of saying ball. This process only takes ONE minute at the most.

Let it proof on the board for 45 minutes. Yes, just leave it like that. Don't worry too much if you don't see it expands. High hydration bread do not expand much during proofing stage.

20-15 minutes before you bake your bread, preheat your oven while placing a pizza stone, or a terracotta baking tile, or a poor man tool like I use; a pyrex pizza pan, in your oven. Make sure that the pyrex stands extreme temperature because we will be baking the bread at 225C.
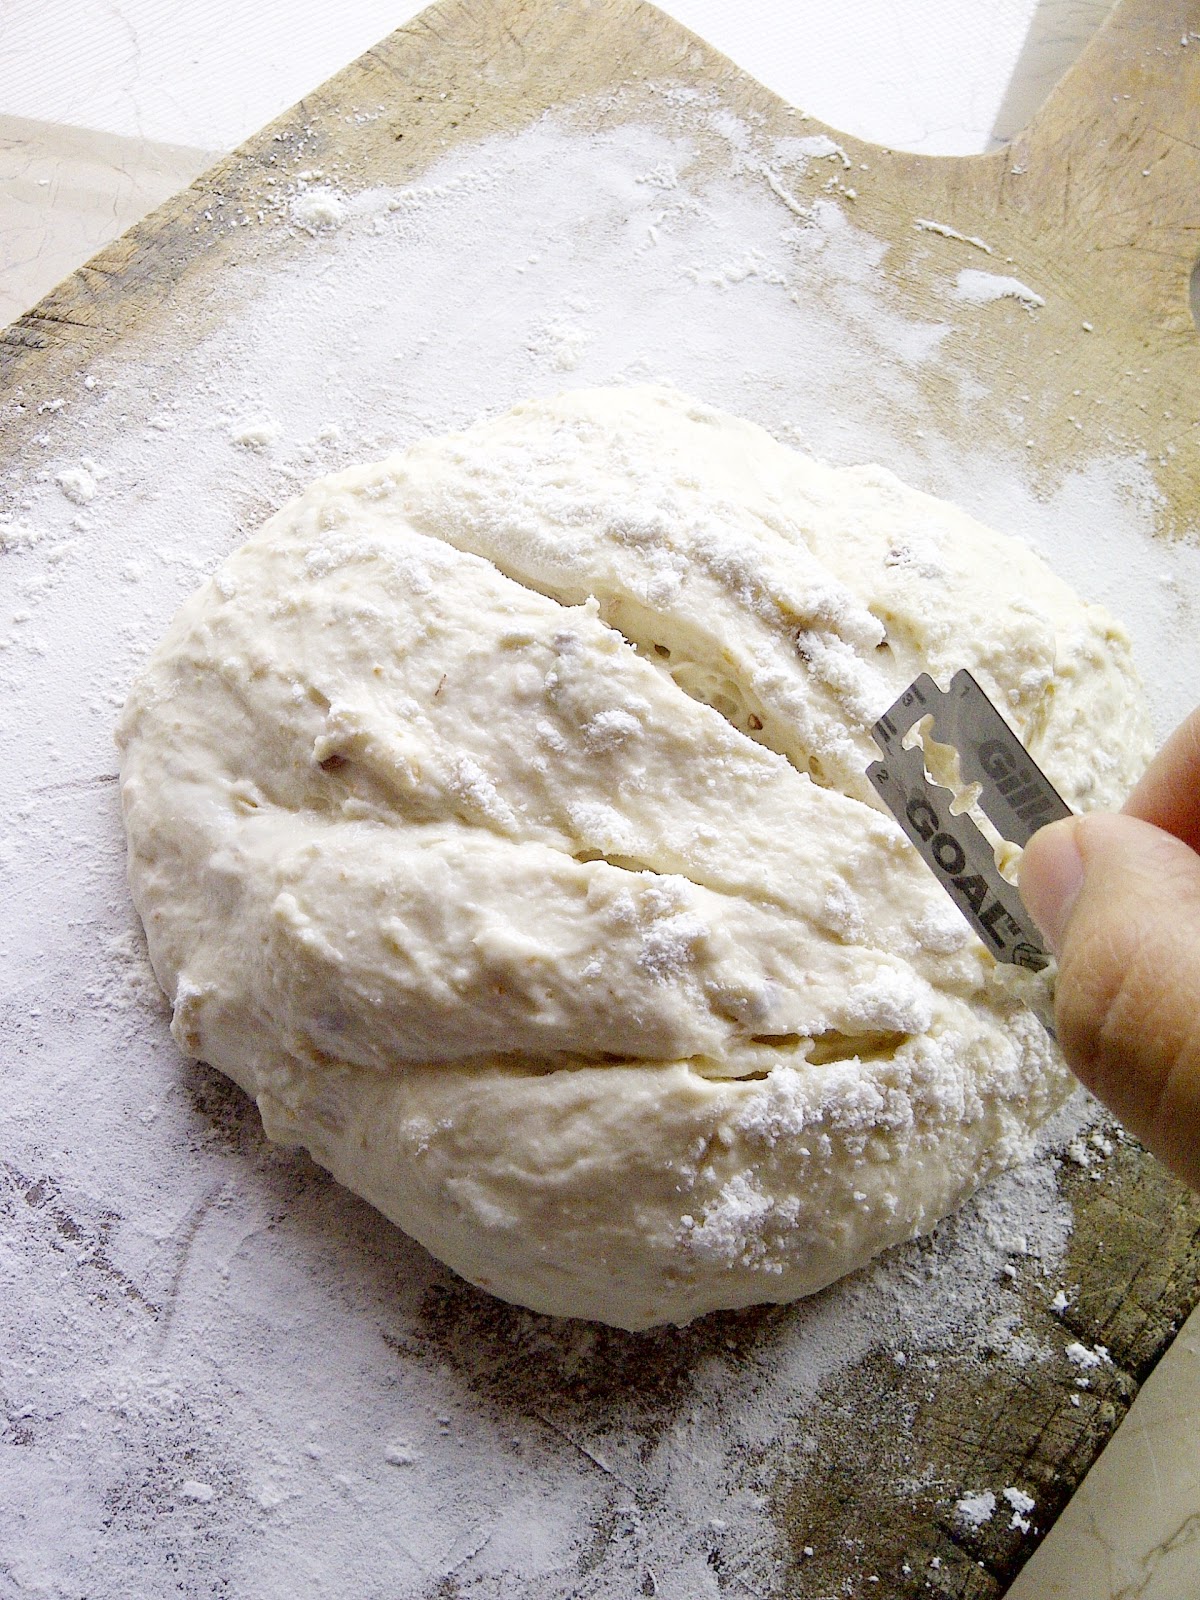
A couple of minutes before baking, sprinkle your dough with flour then score it anyway you like it. Your bread, your style. I use an old school razor blade because my serrated knife is too dull to make a good cut. It is so tame it wouldn't cut my skin.

Right before you bake, prepare an old unused iron pan and put some ice cubes in it. Slide it under the rack of your pizza pan to create steam while the bread is being baked. The position should be like the picture above (I took the pic before baking the bread. You need to put the ice cube filled tray after you slide your bread onto the pizza pan). If you have an imported French oven that has steam injection, I envy you. But since I do not have it, and I am pretty sure I will not find anyone within the radius of 100 miles who owns it, then we shall create steam with this scurvy way. The purpose of creating the steam in the oven is so the bread will have an exceptionally crunchy crust. After all, what good is french bread without a good crust.

Now slide the dough onto the the preheated pizza pan and bake at 225C for 30 minutes. Remember to put the tray filled with ice cubes in. After 30 minutes, turn off your oven and do not open the door for at least 10 minutes.

Another one of my scurvy poor man trick to create steam in the oven is to fill a small gardening spray bottle with water. I open the oven door a bit and do a quick spray every 5 minutes for the last 10 minutes of baking time. But do not do this if you are using an electric oven. Just use more ice cubes.
VOILA!

Do I even need to tell you how crunchy the crust is?

My friend, THAT is a bread that you can be proud of.
Do resist the urge of cutting the bread for at least 40 minutes. Okay, I just made that up. The rule of thumb is supposed to be 1 hour. But who am I kidding? Waiting to cut this bread feels like hell!
But I am seriously serious. The reason why we cannot cut a fresh out of the oven bread because the inside of the bread is still cooking and the crust is still 'singing'. You can literally hear the crackling sound the crust makes as it cools. If you cut it while it's hot, you will risk squishing the pretty bread. Even the sharpest knife will never prettily slice a hot bread.
Now is the moment of truth, let's check the texture of the crumb...

Those big, precious, uneven, beautiful holes are exactly what we are aiming for. They are called custard. Everything I have ever wanted from a rustic peasant bread. If the bread did not produce holes likes these, then it is too dense. Either you have overworked the dough or you incorporate too much flour in the making.

I hope you will find that 5 minutes is not too much time to spend in your busy schedule to make a good bread for you and your family.
Happy baking!
 Pin It
mbak amy, saat ini aku punyanya baking pan yang bulet itu, cuma satu layer. belum sempet nyari oven tangkring. naruh ice cubesnya di sekitarannya aja gitu?
ReplyDeleteHalo! Maaf baru balas ya :) baking pan bulet dan 1 layer.. Hmm.. Lebih baik coba resep yg lain saja dulu drpd nanti es nya ngegelosor. Kecuali rotinya dimasukkan dalam loyang roti.
DeleteHalo..
DeleteMungkin saya bisa sedikit membantu menjawab pertanyaan Peni. es batu atau air dingin yang digunakan untuk menghasilkan crust di permukaan roti bisa diletakkan di sebuah wadah tahan panas. Wadah tersebut kemudian bisa diletakkan saja di ruang yang tersisa di sebelah baking pan tempat memanggang roti. Hasilnya akan sama. Semoga cukup membantu. Selamat mencoba.
salam, Retno